

Continuous Frame Capture and Analysis Software Project at Radiation Science and Engineering Center
| Participants: | Sacit Çetiner, Graduate Student |
| Jared Hoover, Undergraduate Student | |
| Jack S. Brenizer, Professor of Mechanical and Nuclear Engineering | |
| Kenan Ünlü, Professor of Mechanical and Nuclear Engineering | |
| Services Provided: | Neutron Beam Laboratory |
| Sponsor: | RSEC |
| U.S. Department of Energy-Innovations in Nuclear Infrastructure and Eduaction (INIE) |
Introduction
The primary goal of this project is design of software that can capture and store neutron radiography images at a rate close to real-time. The main advantage of the software is that it brings digital recording capability. Once stored digitally, images can be accessed for post-processing or for future analyses.
The application and the user interfaces are written in Java. Java is a computer programming language that fully supports portability among different operating system platforms. This allows the execution of applications across different computers and operating systems without even recompiling the source code. The only thing that the software requires is that the Java interpreter be installed. Java compiler and Java Virtual Machine can be downloaded free of charge [ 1 ] . A normal user should select from under the JRE column, which stands from Java Runtime Environment . This option will install the Java interpreter and Java Virtual Machine (JVM). More advanced users might be interested in installing SDK, Software Development Kit , which also installs a standalone IDE ( Integrated Device Environment ) for Java from Sun.
The core functions of the software are based on the ImageJ [ 2 ] Java libraries. The library functions that are made available by NIH (National Institute of Health) include drivers that can communicate with the frame grabber hardware, methods that can open, save almost all image formats commonly known, and methods that can perform essential image processing.
Key features of the Penn State Frame Grabber (PSFG) software
The main objective of the software is to save the captured images on a block device in an organized way. During a 30-min image recording at the maximum available sampling rate, one collects more than 30 thousand images each around 300 kB, which amounts to a disk space of about 10 GB if collected at 8-bit and saved in TIFF format. In order to access any particular image out of that many images, we implemented a unique way to store the data. Following sections will elaborate on this, but it suffices to say for now that this feature is one of the most outstanding capabilities that the software has to offer that incredibly facilitates data handling.
Another important feature of the software is that it saves the references that are linked to each frame, i.e., file location and the system clock at which image is captured. This allows the user to locate each image even after the image collection is completed. Another important advantage of this is that these references are used during post-processing, mainly while images are converted into a QuickTime movie.
The software also comes with movie conversion tools. This utility program creates a digital movie file from the image collection from a plenty of video formats without altering original images. For portability and availability purposes, we chose Apple QuickTime player as the media player application to run videos.
At present, the software is defaulted to capture and record images in only 8-bit format.
The Hardware
Because The Penn State Frame Grabber software is written in Java, it is possible to run the application on any platform. However, the reader might be interested in getting a sense of performance related to the specifics of the hardware.
The image collection application runs on a Macintosh G4. Here are the specifics of the computer:
- Apple Macintosh G4, Dual 1.43 GHz processor,
- 2 GB physical memory (RAM),
- 600 GB storage capability,
- 256 MB AGP video card,
- Scion LG-3 card is installed as the frame grabber hardware.
The computer was a leading edge product as of last year to assure the highest performance for the application. We think that the reduced sampling rate of the application for image collection, 22 frames per second is the highest rate we could attain, is an artifact of the Java programming language.
In Java, applications are not executed directly by the operating system kernel. Instead, each Java process is interpreted and handled by a standalone kernel called Java Virtual Machine (JVM). The presence of JVM brings a lot of simplicity as far as the portability of the code is concerned at the cost of deterioration in execution performance.
One should expect a performance degradation should the application be run on a slower computer.
If further performance is needed, then the code needs to be rewritten in a lower level programming language, like C++ or Object-Oriented C++. Only after then may one get a better performance.
The Software
1. Main Window Application
The main user interface is shown in Figure 1 during a recording process. This interface is the parent application of all the applications and can execute all the children from within.
The interface allows for inputting real run time of the recording application. The user may also choose to run the application without a time limit by selecting the Run Continuously checkbox. In the continuous run mode, the user should be aware that the density of data collected is substantial, and depending on the hard disk storage capacity, the application might run into a disk overflow runtime error, which will prematurely terminate the application and might as well result in an operating system crash.
The application will save images on the hard disk by default. However, one might want to run the application solely to observe the media without storing any image. So if the Save to HDD option is disabled the application will not save captured images on the hard disk.

Figure 1 . Main window that interfaces frame grabbing and movie conversion applications
Another option, which some users might find quite useful, is the Real Time Stack option. This option will enable image storage in the physical memory, RAM, at a cost of being limited by the physical memory. One should expect the highest sampling performance should this option be enabled and hard disk storage be disabled. As a mean for comparison, for our system given in the hardware section, we usually get a sampling rate of 14-18 frames/sec by enabling the hard disk storage and disabling the real time stacking. Disabling the hard disk storage and enabling the real time stacking would bring the sampling rate up to 18-22 frames/sec, which might be critical for fast dynamics. The user should also be aware here that physical memory is generally more restricted in capacity than hard disk; therefore the application should be run for shorter periods. Otherwise, should the application overrun the amount of memory that it is allowed to allocate maximally, the application will be terminated prematurely, and in some cases and/or systems, the environment might end up in a system crash .
Real Time Process option allows for image processing on-the-fly. There are several options for image processing, and the user can conveniently select these from the Options menu, as shown in Figure 2 . The application will perform only the selected algorithms during recording session.
The main application interface also lets the user adjust the sampling rate. Because there is no a priori knowledge on maximum available sampling rate, this selection has no upper limit. However, one should anticipate that the recording performance will be primarily limited by the runtime environment. If the user wants to reduce the sampling rate further, which in some cases might be important, this option allows to do that.
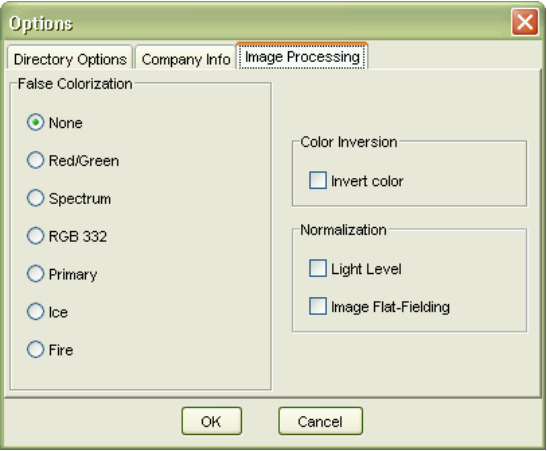
Figure 2 . Options window allows for enabling/disabling different capture and recording capabilities...
Figure 2 shows the Options window available under the Tools menu. Under Image Processing tab is presented all the accessible image enhancement/processing options.
2. File Organization
We mentioned the difficulty of handling large quantity of images before. Our group implemented a unique technique for data organization for this project.
Figure 3 shows a file browser window. The top level directory that stores the images in a structured way is provided by the user from the Options window under Directory Options as shown in Figure 2 .
Once the top level directory is provided, a directory is created in the following format:
Company Name' - Project Name' Month' Day' @ Hour' Minute'
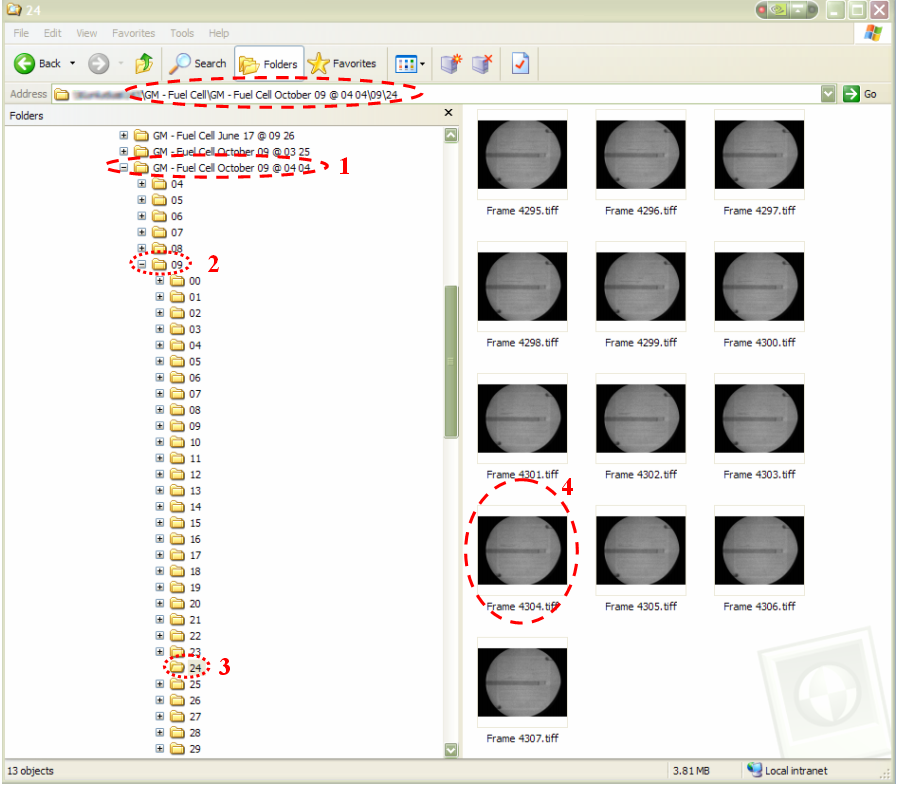
Figure 3 . Directory structure in which captured frames are stored... Please note that the time stamp that is showed in big red dashed oval on the video in Figure 7 : The above directory structure is created based on the information from the system clock, and the same time stamp is printed to the top of each frame in video along with the associated frame number.
As an example, the directory name as shown with 1 st dashed red oval in Figure 3 can be examined as follows:

Having created the main directory for a particular experiment, the application continues to create new directories under this for each minute that follows. The 2 nd red dashed oval in Figure 3 is an example.
Under each minute directory that is created, new directories are created for each second to come, as shown with the 3 rd oval in Figure 3 . Images that belong to that time interval, i.e. the minute and the second, are recorded on the hard disk under the associated directory. Because the same operation is performed continuously, each image goes to the correct location, which makes file tracking very straightforward.
During the image recording, the application also saves the references to file location and capture time for each image to related files. Figure 4 shows the details from the file location and recorded time for Frame 4304, which is the same frame marked as 4 in Figure 3 . These references will be used by Movie Builder, as will be discussed in the next section.

Figure 4 . Each image is recorded with its directory location and time stamp.
3. Movie Builder
Still images have only very little to say about the dynamics of the system being observed. The motion of a system can only be captured in a movie format. Movie Builder acts as an intermediary tool for conversion from a collection of images to a particular movie. Figure 5 shows the user interface for Movie Builder.
Movie Builder is designed both as a standalone utility application and as an embedded tool in the main application: The user can execute the code by selecting Tools > Create Movie > Create Movie from Files menu item.
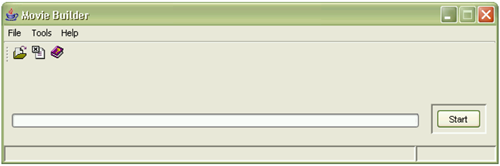
Figure 5 . Movie Builder utility to convert collected an image collection to a QuickTime movie...
The interface is fairly simple to use. Before commencing the conversion process, Movie Builder expects the user to enter the top level directory where the image collection is stored. For a legitimate entry, the user is supposed to provide a directory with fileList.txt, timeStamp.txt , and codecSettings.txt files. Otherwise, the conversion process is not commenced and the user is given a warning.
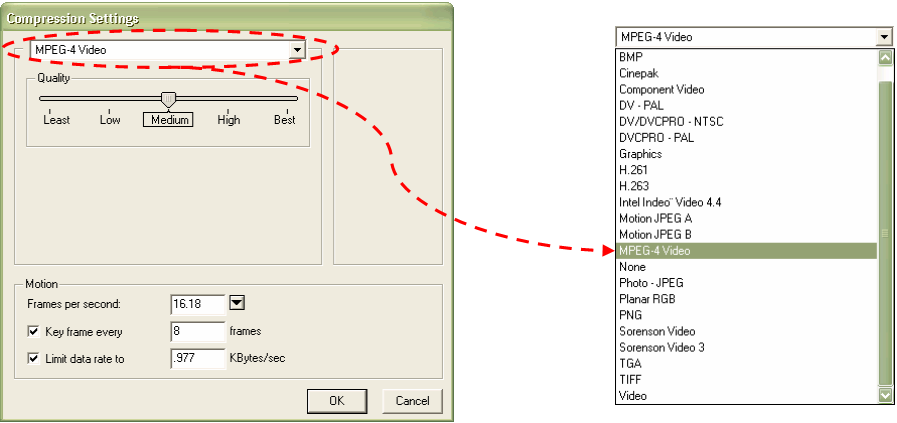
Figure 6 . Compression settings dialog window (left) Motion frame rate is automatically retrieved by the application from the execution log for each run. Users can choose from a multitude of video encoders (right). The default encoder is set to MPEG-4 Video for its superior features.
If the user inputs a valid directory, the user is then asked to choose the movie compression parameters as displayed in Figure 6 . First the compression encoder is to be chosen from a dropdown menu. Then, depending on the specifics of the movie encoder, other parameters are chosen.
Quality is usually a common motion picture conversion parameter, which determines the resolution of the video, and therefore the file size. Generally a medium quality works pretty well. For example, with MPEG-4 Video format at medium quality, one gets an astounding compression ratio of about 1/50 with a reasonably fine resolution.
Having set the compression parameters, Movie Builder starts to create the video from the image collection scanning from the first through to the last directory in the list. During the conversion process, reference information is also attached to the movie, as demonstrated with a video sample recorded for General Motors Fuel Cell Project in Figure 7 . The white band at the top with information for each frame in the video is called the header . The header is optional and is added to help the user keep track of frames easily. The information includes the company and project name, as indicated with the blue oval, and other important references. The user will be able to locate a particular frame down the stack by looking at the time information. As an example, the 1 st and the 2 nd red ovals in Figure 7 give hints regarding the whereabouts of Frame 4304. In fact, Figure 3 illustrates how to track down a particular frame in an image collection, Frame 4304 in this case.
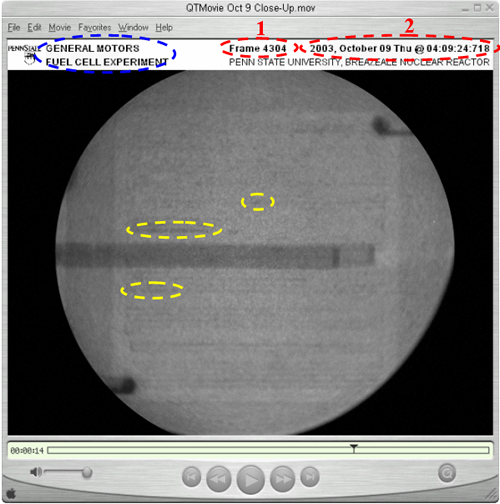
Figure 7 . Video can be played by QuickTime Media Player. One advantage of QuickTime is that it can be freely downloaded for almost all operating systems.
The conversion process is rather time consuming. As an example, the conversion of 10 thousand images takes about 2 hours to complete on a 2.8 GHz-Pentium 4-processor PC; much longer than the image collection time. Part of the reason is that the conversion algorithm requires further reduction of hard disk access time with improved memory allocation, and additional code optimization. Another reason for this delay is that header addendum is a CPU demanding process.
After the conversion is finished, Movie Builder notifies the user that the process is complete; otherwise it will give an error message. The user will find the QuickTime movie file in the top level directory that was chosen when Movie Builder was first started.
4. Playback with QuickTime Media Player
QuickTime is a media player application from Apple Computers. The base version of QuickTime can be downloaded from the product website [ 3 ] free of charge.
The movie is platform independent and can be played back on any computer and operating system provided that QuickTime application is installed and the video decoder for the movie is supported. If the required decoder is not installed in QuickTime, the application automatically warns the user and asks to download the codec automatically.
Ongoing Work
The following capabilities are to be added in the future versions of the software:
• capturing and/or recording images in 8-bit, 12-bit, and 24-bit format (this requires hardware support)
• a new utility program, Frame Explorer , that allows for browsing and seeking back and forth in a directory structure that keeps the image collection,
• better movie conversion performance
Download Information
The software can be downloaded at http://nesrin.rsec.psu.edu/PSUFrameGrabber/
Acknowledgement
We would like to thank developers at the NIH and contributors of the ImageJ software, particularly Wayne Rasband for his help to the development of the software.
References
• Download Java 2 SDK, v 1.4.2_02 (J2SE), http://java.sun.com/j2se/1.4.2/download.html
• ImageJ Software, National Institute of Health , http://rsb.info.nih.gov/ij/
• Apple QuickTime Download web page: http://www.apple.com/quicktime/download/
This is a hardware and/or operating system dependent issue.
